eSign Documents
Upload documents, send them for eSign, select the signature type, track signatures, and purchase additional sign credits.
What is eSign Documents?
eSign Documents is the electronic signing module in OctoGenie Legal. Use it to upload files, add signers, choose a signature type, send documents for signing, track status, and buy extra sign credits when needed.
Signature types
- Aadhaar eSign — Aadhaar-based eSign process
- Electronic Signature — standard electronic signing
- Electronic Signature with DSC — sign using a Digital Signature Certificate
Quick process
Login → eSign Documents → New Document → Upload → Add Signers → Select Signature Type → Review → Send → Track Status → Complete → Save Signed Document
How to Access eSign
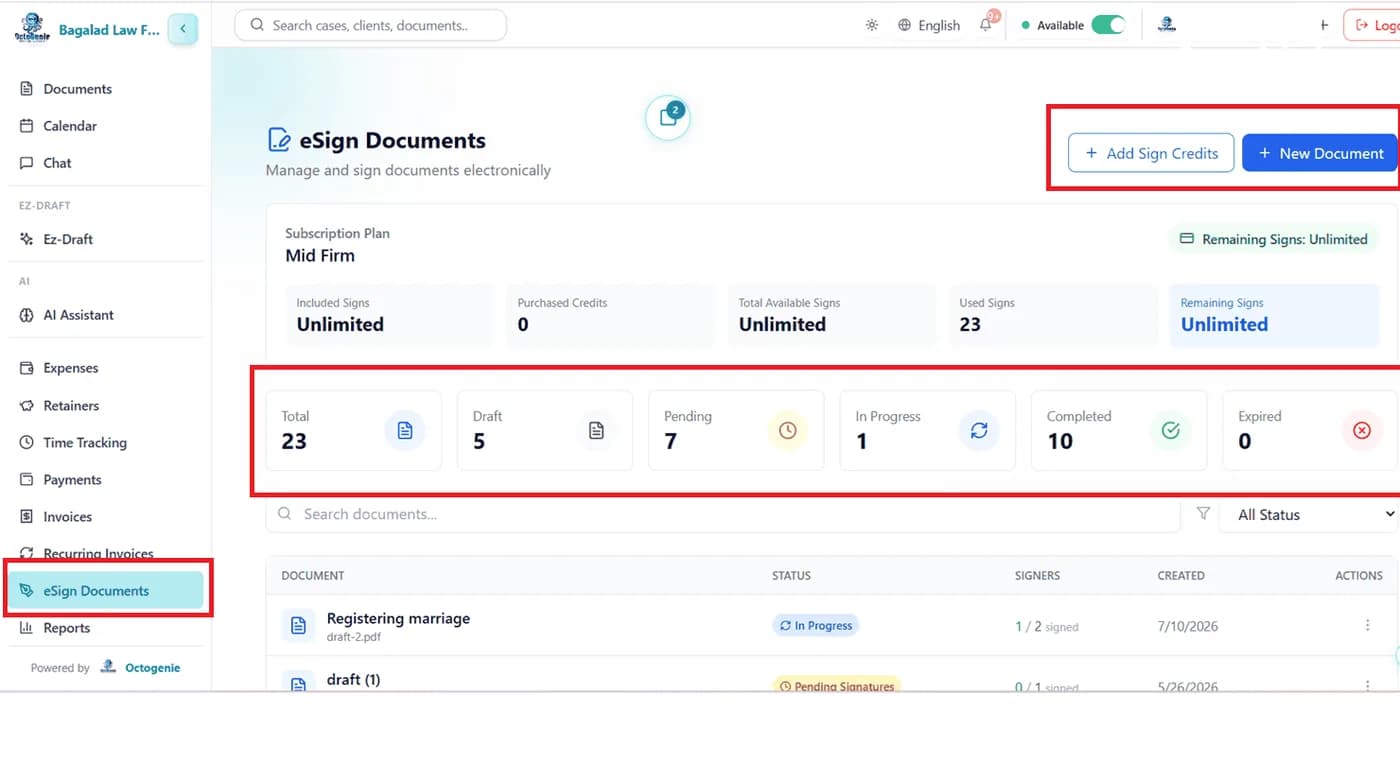
Navigate to eSign Documents from the left menu
How to Access eSign
eSign Documents is used to upload files, send them for electronic signing, track signature progress, and purchase additional sign credits in OctoGenie Legal.
Log in to OctoGenie Legal
Log in to your OctoGenie Legal account using your credentials.
Opens in a new tab • partner.octogenie.com/
Open eSign Documents from the Left Menu
From the left-side menu, click 'eSign Documents' (placed after Ez-Draft). The eSign dashboard will open.
Opens in a new tab • partner.octogenie.com/esign-documents
Review the Dashboard
The dashboard shows total documents, draft documents, pending signatures, in-progress documents, completed documents, expired documents, and available/remaining signs.
Opens in a new tab • partner.octogenie.com/esign-documents
Pro Tip
- Use the status cards at the top of the page to quickly see how many documents are in each stage.
You're in eSign Documents!
You have opened the eSign dashboard and can upload documents or track signing status.
How to Upload a New Document
Create a new eSign document from the dashboard
How to Upload a New Document
Upload a file and give it a title so you can add signers and send it for eSign.
Click + New Document
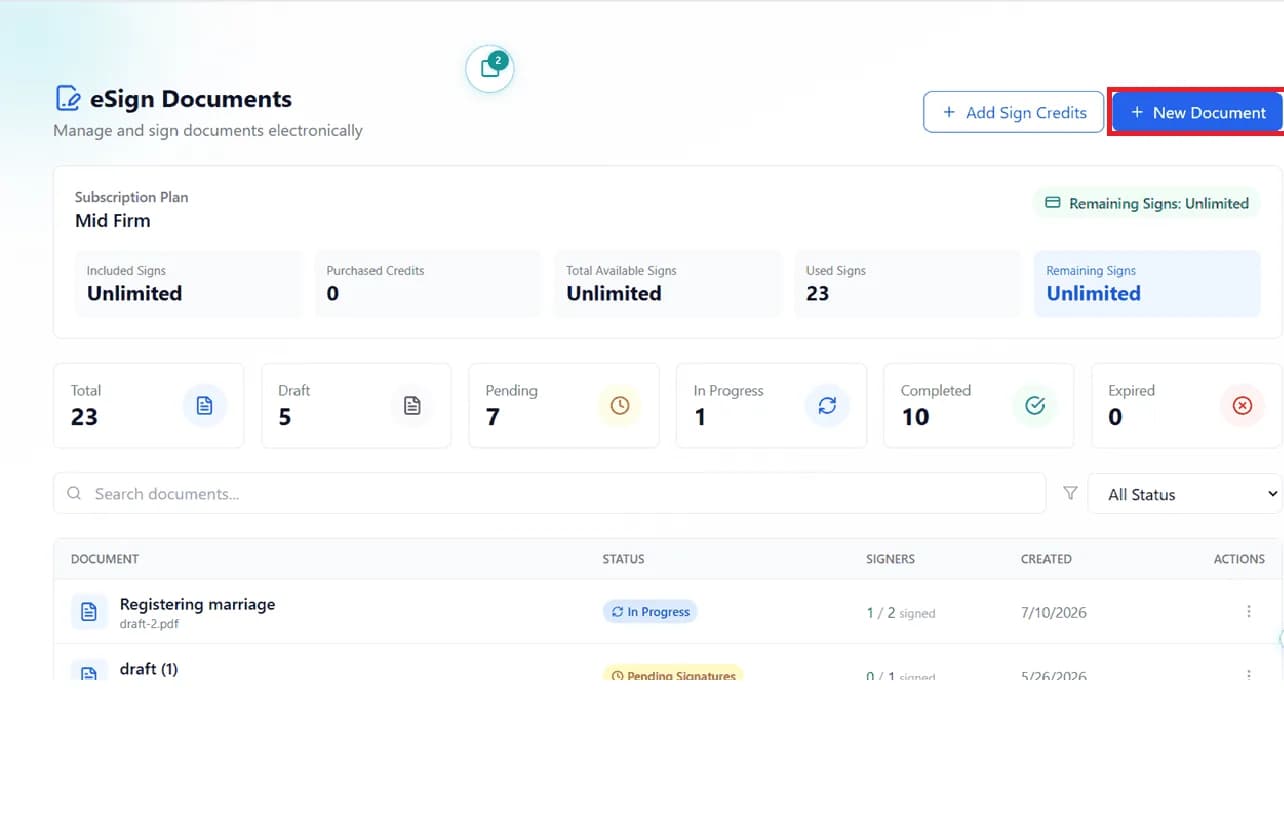
On the eSign Documents dashboard, click '+ New Document' at the top right.
Opens in a new tab • partner.octogenie.com/esign-documents
Enter the Document Title
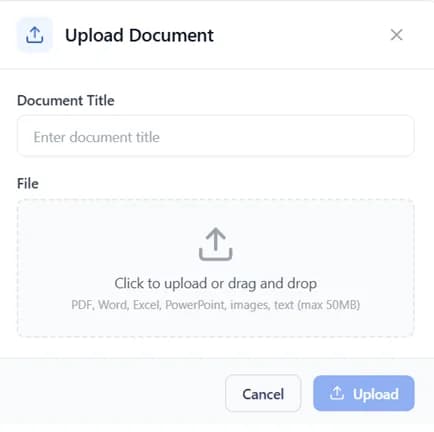
In the Upload Document window, enter a clear document title in the 'Document Title' field.
Opens in a new tab • partner.octogenie.com/esign-documents
Upload the File
Upload the document by clicking the upload box and selecting the file, or by dragging and dropping the file into the box.
Opens in a new tab • partner.octogenie.com/esign-documents
Confirm the Correct File
Check that the correct document has been uploaded. Supported formats include PDF, Word, Excel, PowerPoint, images, and text. Maximum file size is 50 MB.
Opens in a new tab • partner.octogenie.com/esign-documents
Click Upload
Click 'Upload' to add the document to eSign.
Opens in a new tab • partner.octogenie.com/esign-documents
Pro Tip
- Verify the document before uploading so you do not send the wrong file for signing.
Expected Outcome
The document is uploaded as a draft and opens for adding signers and signature fields.
Document Uploaded!
Your file is in draft and ready for signers and signature fields.
What Are the Signature Types, and How Do You Select One?
Choose Aadhaar eSign, electronic signature, or DSC
What Are the Signature Types, and How Do You Select One?
Always select the signature type required for the particular document and signing process. The selected type is applied to signers before the document is sent.
Open the Document
Go to eSign Documents and open the document you want to send for signing.
Opens in a new tab • partner.octogenie.com/esign-documents
Open Signature Type
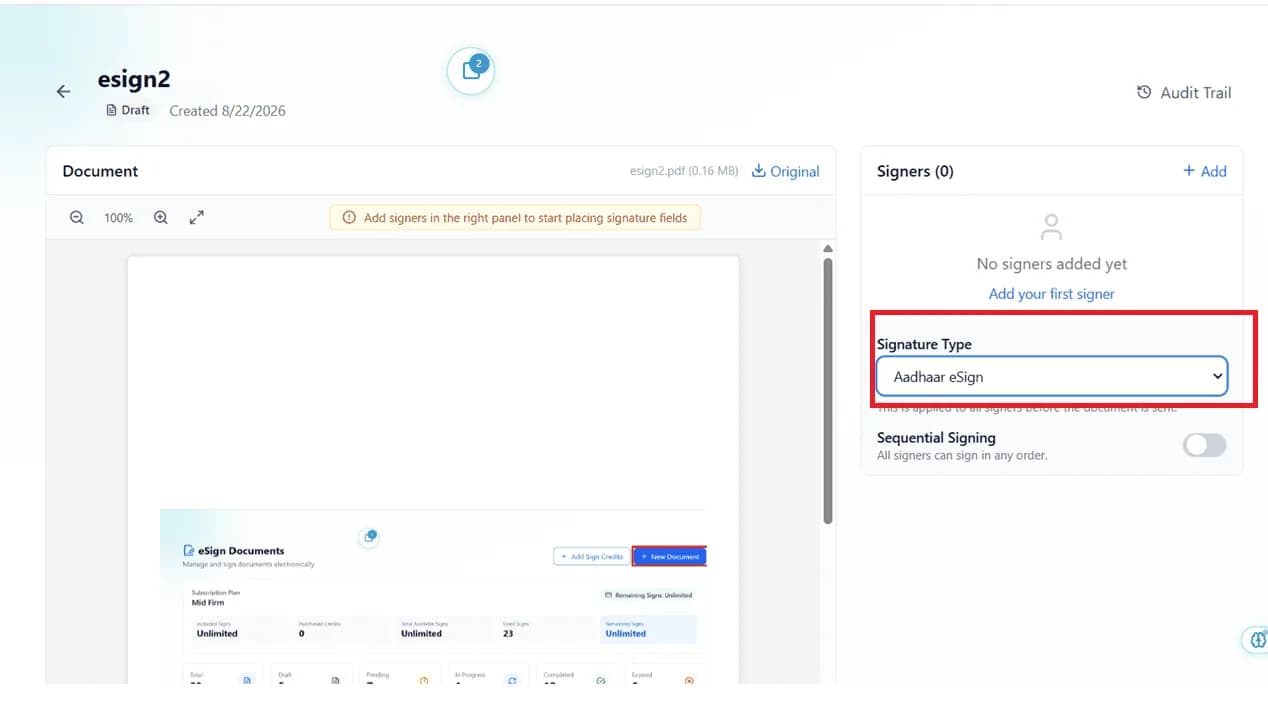
In the Signers section on the right, under Signature Type, click the dropdown menu.
Opens in a new tab • partner.octogenie.com/esign-documents
Select Aadhaar eSign
Select 'Aadhaar eSign' when the signer needs to complete an Aadhaar-based eSign process.
Opens in a new tab • partner.octogenie.com/esign-documents
Select Electronic Signature or DSC
Select 'Electronic Signature' for the standard electronic-signature process, or 'Electronic Signature with DSC' when the signer needs to sign using a Digital Signature Certificate (DSC).
Opens in a new tab • partner.octogenie.com/esign-documents
Continue with Signers
Add the signer details and proceed to place the signature fields. The signature type is applied to all signers before the document is sent.
Opens in a new tab • partner.octogenie.com/esign-documents
Pro Tip
- Correct the signature type before sending whenever possible. If the request has already been sent, follow the available document-management process.
Expected Outcome
The required signature type is selected for the document.
Signature Type Selected!
The required signature method is set for this document before it is sent.
How to Add Signers
Add people who need to sign the document
How to Add Signers
Add each signer’s email, name, and phone number, then choose the signature type. Repeat for additional signers.
Upload the Document
Upload the document first so the Signers panel is available on the right.
Opens in a new tab • partner.octogenie.com/esign-documents
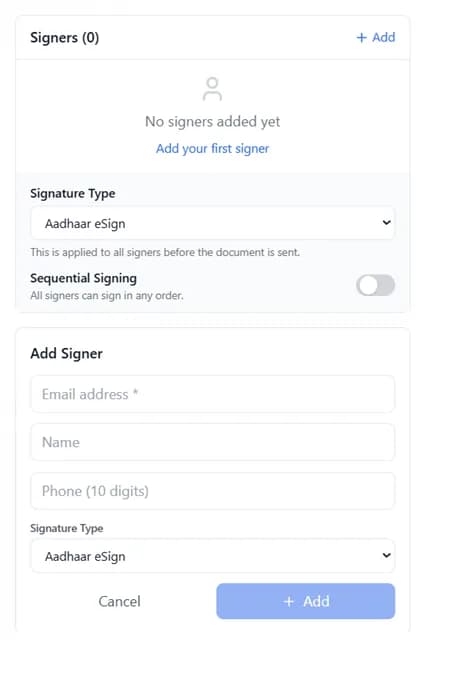
Click + Add in Signers
On the right side, click '+ Add' in the Signers section.
Opens in a new tab • partner.octogenie.com/esign-documents
Enter Email Address
Enter the signer’s email address. This field is required.
Opens in a new tab • partner.octogenie.com/esign-documents
Enter Name and Phone
Enter the signer’s name and the 10-digit phone number.
Opens in a new tab • partner.octogenie.com/esign-documents
Select Signature Type
Select the required signature type for the signer, then click '+ Add' to add the signer.
Opens in a new tab • partner.octogenie.com/esign-documents
Add Additional Signers
Repeat the same steps to add additional signers.
Opens in a new tab • partner.octogenie.com/esign-documents
Enable Sequential Signing If Needed
If required, enable Sequential Signing to make signers sign in a specific order. When it is off, all signers can sign in any order.
Opens in a new tab • partner.octogenie.com/esign-documents
Pro Tip
- Verify all signer details before sending. Do not add the wrong signer or send without reviewing signature fields.
Expected Outcome
All required signers are added and you can place signature fields on the document.
Signers Added!
Signers are on the document. You can now place signature fields and review before sending.
Review Before Sending
Verify the document, signers, and fields
Review Before Sending
Complete a final check before sending the document for signature.
Check Document and Title
Confirm you have the correct document and the correct document title.
Opens in a new tab • partner.octogenie.com/esign-documents
Check Signers and Signature Type
Confirm the correct signer or signers, correct signer details, and the correct signature type.
Opens in a new tab • partner.octogenie.com/esign-documents
Check Fields and Send
Confirm the signature field is in the correct location, all required fields are completed, and the final document has been reviewed. After verification, send the document for signature.
Opens in a new tab • partner.octogenie.com/esign-documents
Pro Tip
- Always check the document, signers, signature type, signature fields, and final version before sending.
Expected Outcome
The document is reviewed and ready to send, or already sent for signing.
Ready to Send!
The document, signers, signature type, and fields have been checked.
How to Track Document Status
Use the dashboard and Signers column
How to Track Document Status
The eSign dashboard displays the status of each document. The Signers column also shows signing progress.
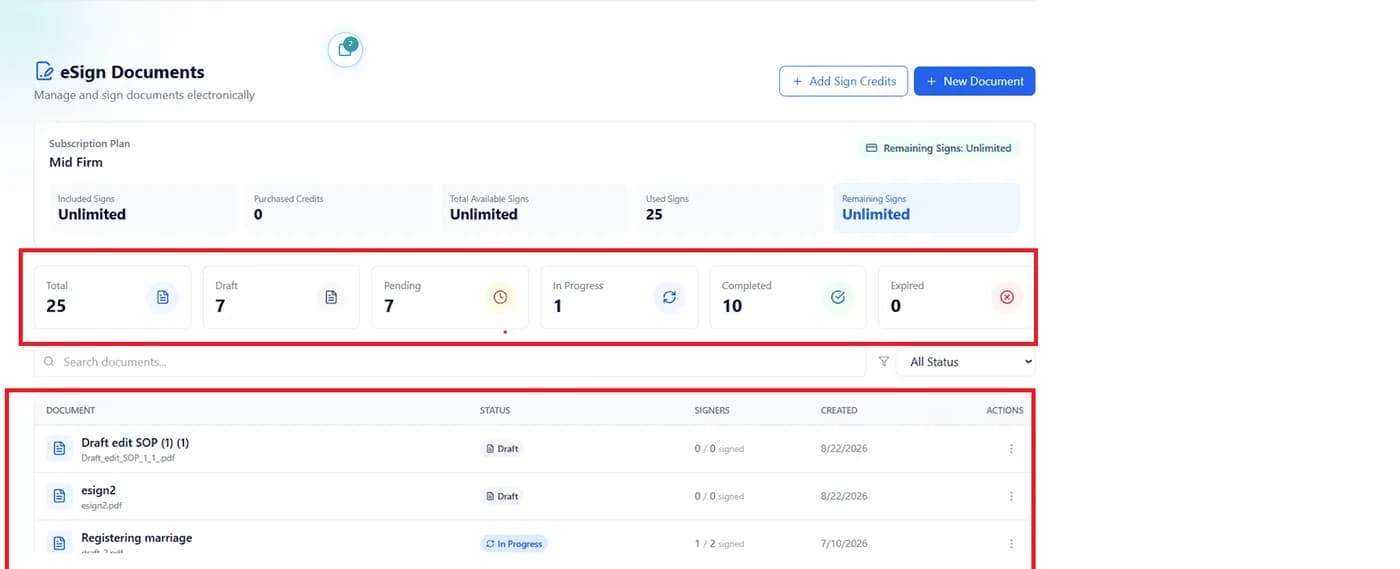
Open the eSign Dashboard
Go to eSign Documents to see status cards and the document list.
Opens in a new tab • partner.octogenie.com/esign-documents
Read the Status Badge
Draft means the document is not yet sent for signing. Pending means waiting for signature or action. In Progress means signing has started but is not complete. Completed means all required signatures are completed. Expired means the signing period has expired.
Opens in a new tab • partner.octogenie.com/esign-documents
Check Signer Progress
Use the Signers column to see who has signed. For example, 1 / 2 signed means 1 signer has signed and 1 signer is still pending.
Opens in a new tab • partner.octogenie.com/esign-documents
Pro Tip
- If a signer has not signed, check the document status and follow up with the pending signer through the approved communication channel.
Expected Outcome
You can see each document’s status and how many signers have completed signing.
Status Visible!
You can see each document’s stage and how many signers have signed.
How to Search for a Document
Find documents by name or status
How to Search for a Document
Use Search documents and the All Status filter on the eSign dashboard to find the file you need.
Go to the eSign Documents Dashboard
Open eSign Documents from the left menu.
Opens in a new tab • partner.octogenie.com/esign-documents
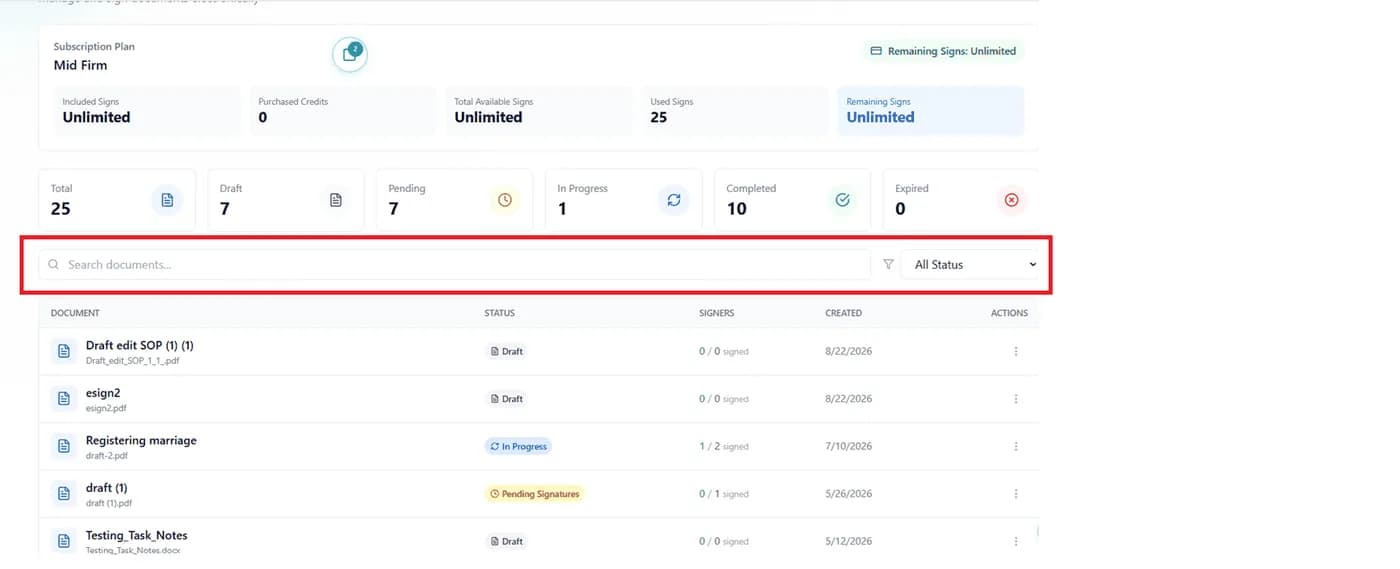
Search by Name or Keyword
Enter the document name or a relevant keyword in the 'Search documents...' box, then select the required document.
Opens in a new tab • partner.octogenie.com/esign-documents
Filter by Status
Use the 'All Status' dropdown to find documents by status such as Draft, Pending, In Progress, Completed, or Expired.
Opens in a new tab • partner.octogenie.com/esign-documents
Expected Outcome
The matching document appears in the list and you can open it from the row.
Document Found!
Search and the All Status filter help you open the right eSign file.
How to Add Sign Credits
Purchase additional eSign credits
How to Add Sign Credits
Buy extra sign credits from the eSign Documents page when your remaining signs are low. Payment is completed through Cashfree.
Open eSign Documents
Go to eSign Documents from the left menu.
Opens in a new tab • partner.octogenie.com/esign-documents
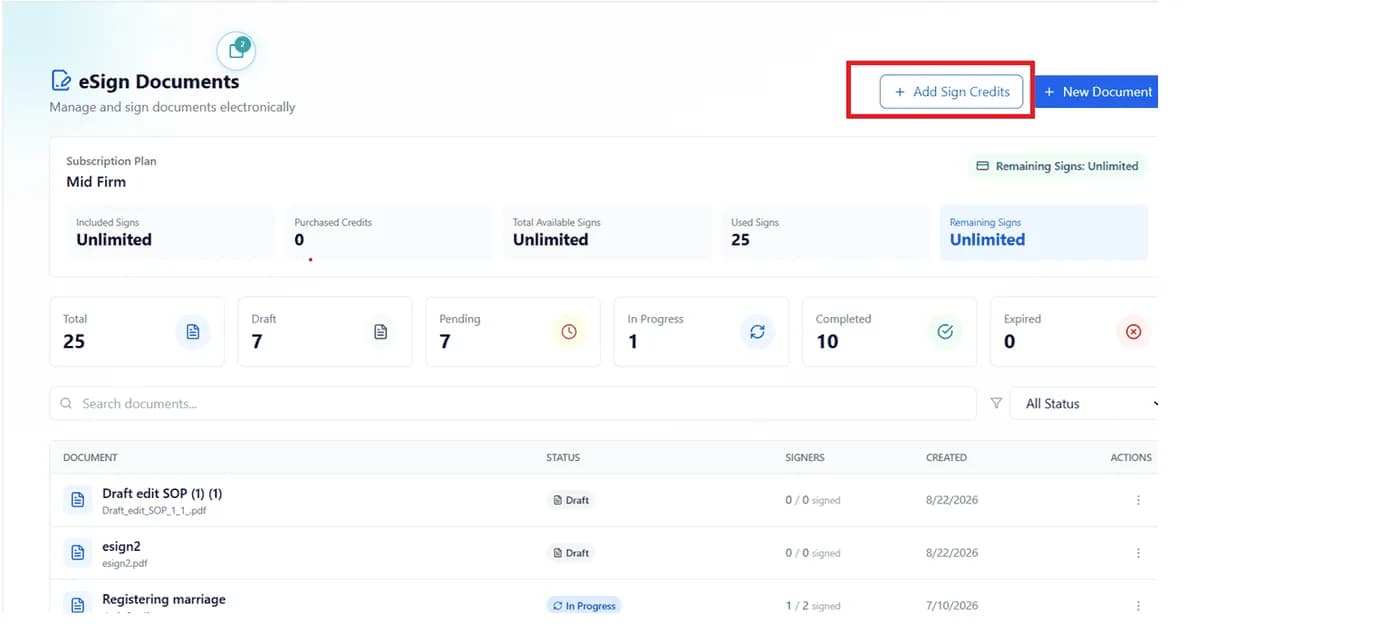
Click + Add Sign Credits
Click '+ Add Sign Credits' at the top right of the dashboard.
Opens in a new tab • partner.octogenie.com/esign-documents
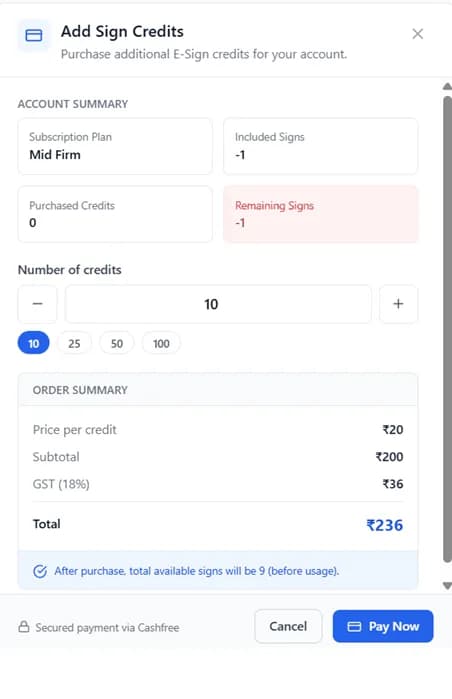
Choose the Number of Credits
In the Add Sign Credits window, choose 10, 25, 50, or 100 credits, or use + / − to select another quantity.
Opens in a new tab • partner.octogenie.com/esign-documents
Check the Order Summary
Review price per credit (₹20), GST (18%), and the total amount, which is calculated automatically. Example: 10 credits × ₹20 = ₹200, GST (18%) = ₹36, total = ₹236.
Opens in a new tab • partner.octogenie.com/esign-documents
Click Pay Now
Click 'Pay Now' and complete the payment through Cashfree.
Opens in a new tab • partner.octogenie.com/payments
Credits Added to Your Account
After successful payment, the purchased credits are added to your account.
Opens in a new tab • partner.octogenie.com/payments
Pro Tip
- Do not make duplicate payments if a payment appears delayed.
Expected Outcome
The purchased sign credits are added and remaining signs are updated on the dashboard.
Credits Added!
After a successful Cashfree payment, purchased credits appear on your account.
After Signing Is Completed
Verify, download, and store the signed document
After Signing Is Completed
Once the document shows Completed, confirm signatures and save the signed copy according to firm policy.
Confirm Completed Status
Wait until the document status shows Completed.
Opens in a new tab • partner.octogenie.com/esign-documents
Verify All Signatures
Verify that all required signatures are present and review the signed document.
Opens in a new tab • partner.octogenie.com/esign-documents
Download or Access the Signed Copy
Download or access the signed copy where permitted.
Opens in a new tab • partner.octogenie.com/esign-documents
Store According to Firm Policy
Save it in the appropriate client or matter folder according to firm policy.
Opens in a new tab • partner.octogenie.com/clients
Pro Tip
- Do not share confidential documents with unauthorized persons.
Signed Document Saved!
The completed file is verified and stored according to firm policy.
Important Do's and Don'ts
Do
- Verify the document before uploading.
- Verify all signer details.
- Select the correct signature type.
- Check signature placement.
- Review the document before sending.
- Monitor pending signatures.
- Store completed signed documents properly.
Don't
- Send the wrong document.
- Add the wrong signer.
- Use the wrong signature type.
- Send without reviewing the signature fields.
- Make duplicate payments if a payment appears delayed.
- Share confidential documents with unauthorized persons.
FAQs
What is the eSign Documents module?
It is used to send documents electronically for signing and track the signing process.
How do I create a new eSign document?
Go to eSign Documents → + New Document → Enter Title → Upload Document.
What file formats can I upload?
The screen shows PDF, Word, Excel, PowerPoint, images, and text.
What is the maximum file size?
The upload screen shows a maximum size of 50 MB.
What signature types are available?
There are three: eSign Aadhaar Signature, Electronic Signature, and Electronic Signature with DSC.
Which signature type should I select?
Select the signature method required for the document and signer. Aadhaar-based signing → eSign Aadhaar Signature. Standard electronic signing → Electronic Signature. Digital Signature Certificate → Electronic Signature with DSC.
What does Draft mean?
The document has not yet been sent for signing.
What does Pending mean?
The document is waiting for one or more required signing actions.
What does In Progress mean?
The signing process has started, but all required signatures are not yet completed.
What does Completed mean?
All required signatures have been completed.
What does Expired mean?
The signing period has ended before the required signing was completed.
How can I check who has signed?
Check the Signers column and the signing progress shown for the document.
Can I search for a document?
Yes. Use the Search documents box.
Can I filter documents?
Yes. Use the All Status dropdown.
How do I purchase additional sign credits?
Click + Add Sign Credits, select the required credits, review the amount, and click Pay Now.
What credit options are shown?
The screen shows 10, 25, 50, and 100 credit options.
What should I do if a signer has not signed?
Check the document status and follow up with the pending signer through the approved communication channel.
What should I do if I uploaded the wrong document?
Do not send it for signing. Correct or replace the document while it is still in draft, if the available options permit.
What should I do if I selected the wrong signature type?
Correct it before sending whenever possible. If the request has already been sent, follow the available document-management process.
What should I check before sending?
Always check the document, signers, signature type, signature fields, and final version before sending.